
Quake 4 Tweak Guide
[Page 5] In-Game Settings
This section contains full descriptions and recommendations for Quake 4's in-game settings. You can use these to get a good balance between image quality and performance, however I can't give you specific instructions on what to turn on and what to turn off. It all depends on your particular hardware combination, and more importantly your personal taste for the trade-off between performance and image quality.
To get a good idea of the type of performance to expect with Quake 4 on your particular system, and to also see which hardware components have the greatest influence on Quake 4's performance, have a look through these articles: Quake 4: AMD vs. Intel CPUs, Quake 4 High-End Graphics Card Shootout, Quake 4: ATI vs. Nvidia, and Quake 4 Performance Review.
To access the in-game settings, start Quake 4 and under the Main Menu click the Settings option, and there you will see the following settings which are explained in detail below:
Controls
This section has four separate categories for player control options you can change: Movement, Weapons, Attack/Look and Other. The procedure to change any of the control bindings is simple: left-click on the key/button currently assigned to a control, then press the relevant mouse button or key you wish to assign to that control setting. Go through all four sections and set the controls according to your taste, none of them have any performance impacts (except perhaps Smooth Mouse).
Also see the Advanced Tweaking section for more details of how to use the bind command to create your own custom control bindings.
Game Options
Free Look: When set to Yes, this allows you to use the mouse around to change your character's view direction. If set to No, moving the mouse back and forward will not make your character look up or down, it will make him walk back or forward. Has no performance impact, set to your personal taste.
Auto Weapon Reload: If set to Yes, whenever your current weapon has fired its last bullet/charge your character will automatically reload it. Has no impact on performance.
Auto Weapon Switch: Setting this option to Yes means that if your player runs over a higher-powered weapon than the one he is currently holding, he will automatically switch to it.
Show Decals: Decals are the marks left on surfaces such as bullet holes and energy scorch marks. Setting this option to No removes all such decals which can reduce realism, but will improve performance, particularly during combat scenes.
Show Gun Model: If set to Yes, you will be able to see the weapon you are holding in front of you. If set to No, your weapon will not be displayed on screen, although it will function exactly the same as normal. Setting this to No can improve framerate due to a reduction in what has to be drawn on screen (the gun model is a complex object) however not having your gun displayed may cause you confusion as to what you are currently holding.
Gun Position: Determines whether your currently equipped weapon is shown to the Right (the default), Lower Right, or Centered. It is up to you, however some people prefer lower right or centered gun positions both because it suits their gameplay style, and because it obscures less of the screen.
Simple Items: If enabled, this option turns all item pickups into icon representations rather than the full model, which can improve framerates and make them easier to identify.
Force Pro Skins: If set to Yes, in multiplayer this option forces all enemy characters to appear to you as using the same single bright skin. This makes it easier to spot them, and is generally preferred for professional gameplay.
Invert Mouse: If you are using a mouse in the game to control your player's view, setting this option to Yes means that pushing your mouse forward will make the character look down, and pulling the mouse backward will make him look up. If set to No, the results are the exact opposite. Has no impact on performance, set to your personal taste.
Smooth Mouse: This slider controls how smooth your mouse movements will be in the game. The further to the right you move the slider, the less jerky your mouse will feel as your mouse movements are averaged out. Unfortunately for most people, increasing mouse smoothness also results in quite noticeable mouse lag, whereby there will be a slight delay between your mouse movements and how that's translated to what appears on your screen. I recommend you move the slider to the far left to disable mouse smoothing if you want to minimize any mouse lag.
Mouse Sensitivity: This slider determines how sensitive your mouse is in the game. The further to the right the slider, the more sensitive your mouse is to being moved. Adjust this setting until you can turn around rapidly, yet also make small changes in your aim without excessive jumpiness. Has no impact on performance. Note, if your mouse is "lagging" in the game, aside from mouse smoothing (see above), this is primarily due to low FPS. You must adjust your settings to improve your average FPS (particularly in detailed scenes and during heavy combat) and you should then notice an improvement in mouse lag.
Crosshair: This option allows you to choose the type of crosshair displayed on screen - whether Custom, or Weapon Default. Selecting Custom allows you choose a user-specified crosshair type which is then displayed for all weapons, and you can set this under 'Set Crosshair' (See below). Alternatively, you can select the 'Weapon Default' option here, and each weapon will show its own unique crosshair type when being used. This has no impact on performance so set according to your tastes.
Set Crosshair: If Custom is chosen under Crosshair (See above), you can select a specific crosshair type displayed for all weapons, simply by cycling through the crosshair types under this setting. Click on the crosshair image to cycle through and select the crosshair which suits you.
Crosshair Size: This setting allows you to choose the size of the weapon crosshair. The options here are Small, Medium, Default, Large and Extra Large. Set it to suit your tastes, and note that you can set a custom crosshair size even when the Crosshair setting is at 'Weapon Default'.
Crosshair Color: These options allow you to customize your crosshair's color. The default is white, however you can choose a different color from the palette shown. Note that you can set a custom crosshair color even if the Crosshair setting is set to 'Weapon Default'. See the g_crosshairColor variable under the Advanced Tweaking section if you want to set a color not shown here.
Once you're done changing these settings click 'Apply Changes'.
System
[Video Settings]
Video Quality: This setting controls the overall image quality of the graphics in the game, in particular the way in which textures (the 2D images covering the surface of all 3D objects in the game) appear. This setting has a major impact on your performance and visual quality, so it's very important that you decide on the right one for your system and tastes. There are four levels of quality: Low, Medium, High and Ultra Quality, and each is covered below:
Low Quality: This mode is designed for a graphics card with 64MB of Video RAM. It uses compressed textures (textures are the 2D images used on the surfaces of all 3D objects) and light maps, and texture resolution is also quite low. The reason for this is that high resolution uncompressed textures quickly fill up your Video RAM and cause a lot of swapping into and out of the Video RAM, creating small pauses and freezes. Texture compression and reducing the resolution of textures keeps the Video RAM overhead low, with the down side being some "compression artifacts" (i.e. blurriness, some pixelation and most noticeably a purplish tinge to textures) and generally quite blurry, low res textures at this setting level.
Medium Quality: This mode is designed for a graphics card with 128MB of Video RAM. There is still compression used for textures, and light and render maps. Texture sizes are not automatically reduced however, so all textures will appear at their full resolution. There will still be compression artifacts however, but once again this must be done to keep Video RAM demand low. This mode is the one recommended for most people as it is a good balance of image quality and performance.
High Quality: This mode is designed for a graphics card with 256MB of Video RAM. In this mode there is no texture compression (which greatly increases Video RAM usage), however light maps are compressed still. It is important to note that in this mode, Anisotropic Filtering is automatically enabled and set to 8x, which is quite high. This helps noticeably sharpen textures as they fade into the distance, however it has a pronounced impact on performance. Essentially in High Quality mode texture quality is improved over Medium Quality due to removal of compression and through use of high level Anisotropic Filtering, but at the cost of a significant performance hit on cards with lower Video RAM and processing power.
Ultra Quality: This mode is the highest possible for Quake 4 and was originally designed for a graphics card with 512MB of Video RAM. No compression is used for anything, hence while graphics quality is at the best it can possibly be (not including Antialiasing, which you can also enable separately), there is a major performance hit for many current systems. Due to the lack of compression loadup times are theoretically reduced, however in exchange for this most systems will notice a lot more freezes and small loading pauses as video information is constantly being swapped into and out of your Video RAM. For the most part the difference between High and Ultra Quality modes is difficult to tell, and thus Ultra mode is not recommended for all but the highest level machines.
A screenshot comparison of the Video Quality settings is shown below (click to enlarge). You can view this comparison as a single animated slideshow here: Q4VidQual_TG.gif (1.1MB) - the animation makes it easier to spot the differences.
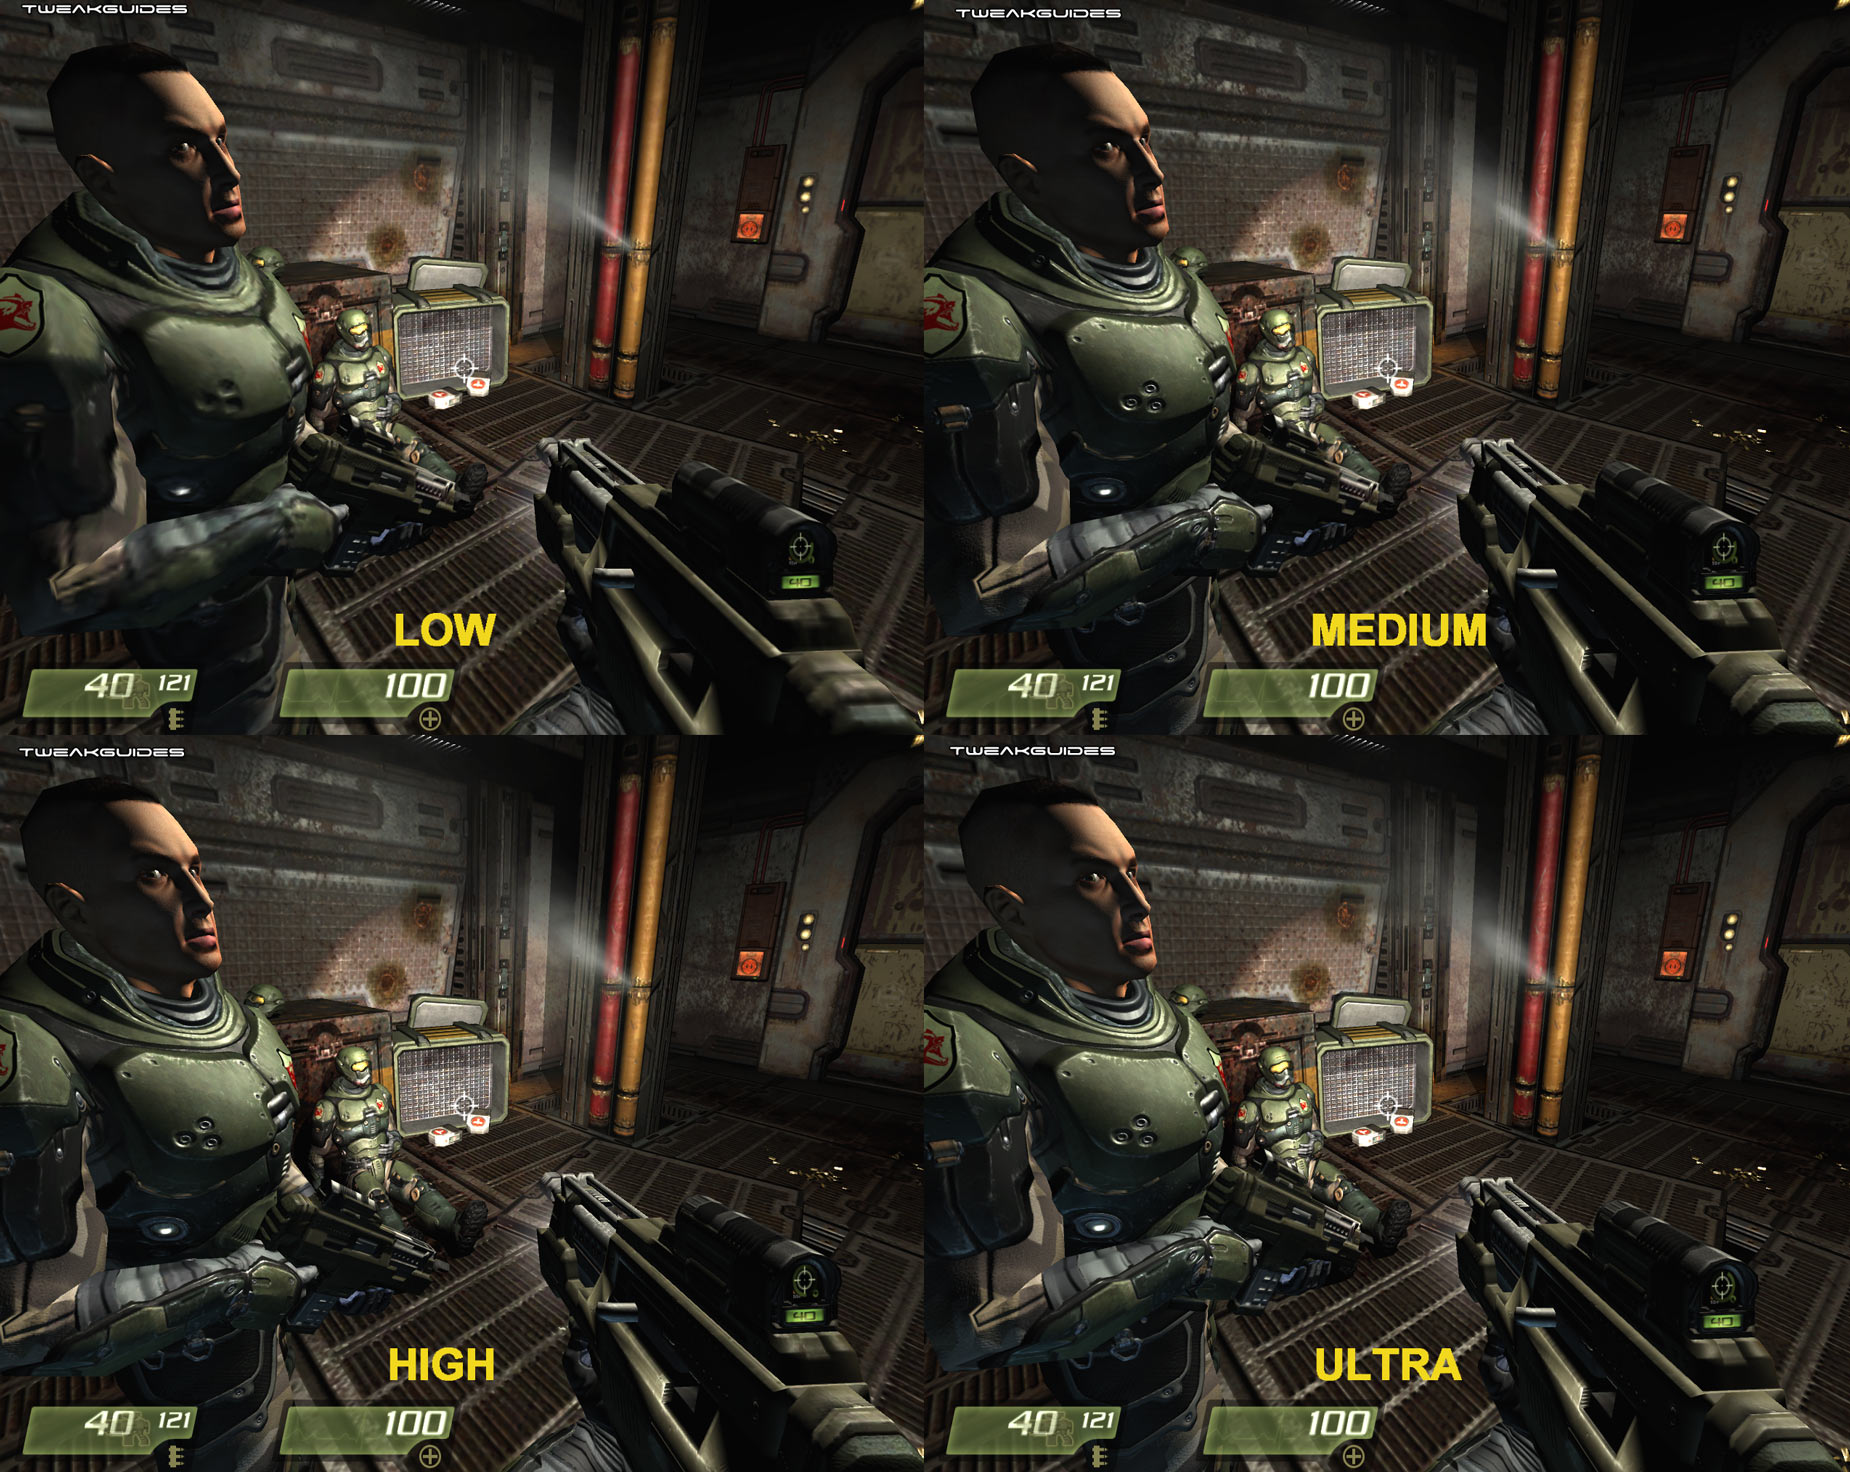
Note the more obvious differences - pay particular attention to the armor, the grills on the ground, your own gun and the door on the far right. Medium dramatically improves the image quality from Low, and is the recommended setting for most people. High adds a few imperceptible details and 8x Anisotropic Filtering where are better noticed while playing the game. Ultra looks very crisp when playing in-game (as opposed to the screenshots), however the difference between High and Ultra is very hard to spot. Notably, there are no texture compression artifacts at High and Ultra levels.
Some important things to note about Video Quality:
Screen Size: This setting determines the resolution of the game image. That means how many pixels are displayed on the screen. A resolution of '800x600' means 800 pixels wide by 600 pixels high on your monitor. The higher the resolution, the more pixels shown and the more detailed and clearer the game image, but it takes more graphics card power (and some CPU power) and hence you will see less frames per second. The highest resolution available in this list of resolutions is limited to what your graphics card and monitor are actually capable of rendering. The resolution has an important impact on your framerate in Quake 4 in conjunction with the Video Quality settings (see above). If nothing else helps you improve your FPS you will have to reduce the resolution.
Note: To set a custom screen size in Quake 4 see the r_mode, r_customheight and r_customwidth commands in the Advanced Tweaking section, as well as the Aspect Ratio setting below.
Aspect Ratio: This setting determines the ratio of width to height of the onscreen image. Most display devices are 4:3 aspect ratio, which is the traditional TV/monitor aspect ratio. However newer Widescreen HDTV's and LCD monitors have a 16:9 (or even 16:10) aspect ratio. If you run a normal display device, 4:3 is the correct aspect ratio choice. However if you run a widescreen device, or are outputting to an HDTV such as a plasma display panel, select 16:9 to reduce/remove the black bars around the image or any odd stretching. If this doesn't work, or you need to set a custom resolution (e.g. to match the native resolution on your panel), once again refer to the Advanced Tweaking section.
Fullscreen: If set to Yes, this means Quake 4 will run in fullscreen mode. This is recommended, as it provides optimal trouble-free performance. However if you want to run the game in a window instead - and possibly see a performance improvement - select No. This will run Quake 4 in a window with the resolution you specify in the Screen Size setting. Note that if the Screen Size setting is larger than your Windows Desktop resolution, parts of the Quake 4 game window will not be visible. Therefore if you plan on running Quake 4 in windowed mode you should specify a Screen Size of equal to or less than your current Windows Desktop resolution. Note that to reduce the potential for problems in windowed mode, your Windows Desktop should be set to 32-bit color. Also note that running in windowed mode may cause additional problems and instability, due to memory management issues, so bear this in mind if you're troubleshooting.
Brightness: The brightness slider controls the brightness of the game image. The further right you move the slider, the brighter the image. Brightness values which are too high result in washed out and unrealistic images, so don't ramp this setting up. This setting has no impact on performance.
Auto Detect Settings: If you click this option, Quake 4 will attempt to alter the above settings based on what it believes are the best values for the hardware it has detected on your system. Unfortunately, as with all game automatic detection functions, it typically sets values which are quite conservative, and hence I recommend you take the time to manually adjust the appropriate settings for the best balance of image quality and performance.
Note that changing some of the above settings will require you to exit and restart Quake 4 before they come into effect. You may have to do this more than once and recheck your settings to ensure they "stick". Alternatively you can insert your preferred settings into a config file and have it run each time at startup to guarantee your settings remain the same - see the Advanced Tweaking section.
The next page continues the in-game settings by looking at the advanced video and audio settings in detail.
|
|